Friday, December 4, 2015

Creative Jumpstart 2016

Welcome everyone!
 I'm so excited to announce that I'll be participating as an artist in Creative JumpStart (CJS) 2016, run for the 5th time by Nathalie Kalbach. If you're not familiar with CJS, it's a one-of-a-kind online event to kick your creativity into high gear in January 2016. 
Learn techniques, discover new materials, and connect with artists and crafters. 
Throughout January participants get 25 downloadable videos from 24 featured artists. I'm proud to be one of those artists, called “JumpStarters.” See for yourself:


Creative JumpStart 2016 Teaser from Nathalie Kalbach on Vimeo.


Head on over to Nathalie's site to sign up and for more details: 
Click here to view more details
You get 25 videos for just $45 (USD) for a limited time if you sign up before December 31, 2015 at 11:59 pm (EST)!
But wait – it gets better: as my valued reader, you’ll get $5 extra off today. Just use this coupon code during checkout:
cjs2016
*This is a limited offer valid from 10:00 am Dec 4, 2015 to 11:59 pm EST on Dec 11, 2015.
So what are you waiting for? 
  
Sign up here  Click here to view more details , and apply the coupon code during check out process

Much love my friends!!

Paula

Monday, March 9, 2015

Art Journal Update

I am back and have been arting lots!

I have become obsessed with my Midori!


I have been playing around with watercolour paints:


I have also been doing a lot of streaming and art journaling:


I hope you will join me Wednesday afternoons at 5pm EDT and Saturday nights 9:30pm EDT over on Ustream  See you there!

Much Love,
Paula

Monday, November 3, 2014

Winner!!!!

Hi Everyone!

I am away in Bonavista, Newfoundland but wanted to announce the winner of the Artistcellar hop!


  1. I have learned so much from you Paula! My favorite technique is WATCHING.. lololol and using baby wipes with the stencils!! Thank you so much for an awesome stream.. not just this one.. but over the years! I don't think you really know how much they impact our learning qualities!! tfs xoxo

    Congrats Meko!!!!! <3  I counted from post #2 as the first was removed/double post. :)


Wednesday, October 29, 2014

Altered Magazine Art Journal Page with Kaleidoscope Stencils

Welcome everyone!

I was so excited to play with the new Kaleidoscope Series by Cecilia Swatton, Artistcellar's newest Signature Series Artist.  I love stencils that will work as a background for any theme page... and they are gorgeous to boot!


I received the stencils around the same time I was gifted some "Deli Paper".  I had heard it's all the rage in mono printing, so I thought I would test it out.  Here are the results:


I really enjoy have a set of four coordinating stencils while layering with the Gelli Plate!! 

See all the designs in detail HERE: http://www.artistcellar.com/stampstencil/acSignatureSeries.html

I then ripped and collaged pieces of the printed deli paper and glued them into my altered magazine art journal that I will been preparing to take with me on a trip to Newfoundland.  

I chose black paint and removed it with a baby wipe.


I love how you can see both the deli papers and the original magazine through the Kaleidoscope Series stencils.


You can watch the whole process, from the monoprinting to the completed background above right here:


https://www.youtube.com/watch?v=wUsg_ZdN8-Q

Want to win a set of your own?  Let me know in the comment section below what your favourite stencil technique is.  Comments will close November 3rd, 12am EST and a random winner will be drawn.  Don't forget to check out all the other wonderful artists below!! ***GIVEAWAY NOW CLOSED*


October 25th - Lisa Cousineau, Artistcellar www.artistcellar.com/wp

October 26th - Effy Wild - http://effywild.com/
October 28th - Cheryl Sleboda - http://www.blog.muppin.com/
You are here:  October 29th - Paula Phillips - http://www.journalartista.com/
October 30th - Cindy Powell - http://cynthiapowell.blogspot.com/
October 31st - Cecilia Swatton - http://ceciliaswatton.blogspot.com


The above video was recorded as a live class over on my channel on Ustream HERE.  I would love to have you join me! 

Much Love,
Paula Phillips aka JournalArtista


Tuesday, September 23, 2014

A little update

Welcome everyone!

Here is a little update and project.


Much Love!
Paula aka Journalartista


Monday, April 28, 2014

StencilGirl Seth Apter New Release Blog Hop!


Welcome my friends!  If you are new here, my name is Paula Phillips also known as JournalArtista.  

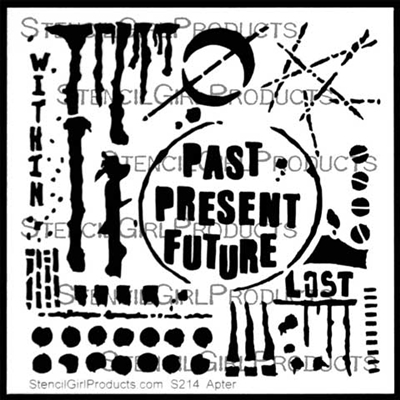
I was so excited to see the new stencil designs by Seth Apter from StencilGirl!

Past Present Future Stencil by Seth Apter


My art journal page started out this way, with a little magazine collage.  I wanted to use the stencil for texture to tie the magazine images into the background. I really loved the colour of the pink flower in the the top right corner:


I did not have a bright enough, nor a pink opaque enough to cover over the background.  I decided to use a coat of gesso through the stencil first, to assure the bright pink would stand out. 

I also wanted to create a shadow effect, so I used a makeup wedge that was slightly wet before applying gesso. I also used a heavy hand when dabbing, purposely making the image fuzzy.


Once the gesso was dry, I realigned the stencil over the gesso.  I chose my current art journal obsession next, the Sharpie Brush marker.  Normally writing over gesso with a Sharpie is bad news, drying them out.  The Sharpie Brush marker does not dry out, and writes so smoothly.  I added bits of pink marker directly over the gesso.


I love how bright it turned out!  I then added strips of washi tape, purple paint to block out the title, and sticker letters.


I really love how the Sharpie marker peeks through the paint, but I especially love the words on this stencil design.  Perfect for my feelings towards the magazine images.  I don't write a lot of words within my art journal pages, I like images to speak for me most times.


Don't forget to continue on on the hop!  There is a giveaway going on on the StencilGirl Talk Blog!  There will be two winners- each one will receive a set of the new 6"x6" stencils designed by Seth. Comment on all the blogs for more chances to win! Contest closes on Sunday, May 4th, 2014 at 11:59pm Central Time.

Blog Hop Order

Much Love my friends!
Paula aka JournalArtista Don't forget to follow me on Youtube!

Monday, March 31, 2014

StencilGirl Andrea Matus deMeng Blog Hop


Welcome my friends!  If you are new here, my name is Paula Phillips also known as JournalArtista

I was so excited to hear Andrea Matus deMeng was designing stencils for StencilGirl! I received Eve, A Modern Woman.  This is a 9" x 12" stencil.  Isn't she stunning??


The first thing I started playing with was Dylusions Spray inks over the right side of a gesso'd art journal page spread.  I sprayed multiple colours and immediately closed the book.  The trick to a good result is letting the pages completely dry before peeking as well as adding a bit of weight on top of your journal.


The right hand side page turned out like this:


I took a waterbrush and moved the Dylusions spray ink around to blend and soften.  Such a fun look turned super fast and simple!  It is also a great way to practice your shadowing technique.


I also chose to start with the same technique in a smash-type book of scrapbook paper:  


This is what the two page spread looked like.  The right hand page now has a layer of gesso over it, applied with a gift or credit card:


I focused on the right hand side page.  I added three half circles of light yellow acrylic paint on top of the gesso.  I then reapplied the stencil and lightly sprayed a dark and light purlpe spray ink.  Once dry, I took a water mister and lightly sprayed the page, tilting to have the ink run slightly. 


I applied the stencil for the third time, assuring the features are aligned.  I chose a black student grade acrylic paint to sponge over the eyes, nose, lips and bottom right half of the face.  I LOVE how this turned out!


Not everything I try turns out great, check out this hot mess! :)  I am still working out the uglies on this one. :)  What went wrong?  Way too much ink, no gesso... however a good coat of gesso will save it.


Remember this technique I shared on the StencilGirl Talk Blog?  


Since I already had the black paint out and my hands messy, I added the stencil over top of the packing tape transfer.  My favourite part of Andrea's new designs is how they are the perfect addition to that awesome background you just hate to cover.


Lastly, I had a lot of extra ink on my stencil so I decided to spray it with water and place between gesso'd pages of my art journal.  Super quick background!


Don't forget to continue on on the hop!  There is a giveaway going on on the StencilGirl Talk Blog!  There will be two winners- one will receive a set of the new 6"x6" stencils and one will receive a set of the new 9"x12" designs.  Comment on all the blogs for more chances to win! Contest closes on Sunday, April 6, 2014 at 11:59pm Central Time.

                              Paula Phillips <--- You are here!


Much Love my friends!
Paula aka JournalArtista

Tuesday, February 4, 2014

For the Love of Ustream

Welcome my friends!!

I have awesome news, FINALLY got working cable internet!!!  It's been a challenging week and a half without internet at home, but it's fixed now.  I was able to upload a few full recordings from Ustream onto YouTube, check out one of my favourites recorded a few years ago:


I will be resuming my regular live stream times this coming Wednesday and Saturday at 9pm EST HERE.  I hope to see you there!

Much Love,
Paula

Wednesday, January 29, 2014

Mixed Media Stencil Packing Tape Transfer

Welcome everyone!

Just a quick post to say I'M BACK! :)


I hope you enjoy and give it a try!!

Also, a quick note about Ustream.  I am streaming again and will go back to my regular Wednesday and Saturday night schedule.  My internet is out at home (who uses phone lines these days????) but a new provider is scheduled to come this Saturday.

I love and miss you all!
Much Love,
Paula

Thursday, October 3, 2013

Who are you watching?


Yes!  I finally figured out how to fix my domain, so we're back for good!  :)

I found this saying while browsing Instagram (I'm Journalartista over there too, I would love to follow you!) and it spoke to me.  I immediately created this page to remind myself.

I love this saying because it means something different to everyone who reads it.  The procrastinator and self-saboteur in me got a wake up call!!

The beginning of this page actually started like this:


I am IN LOVE with all of Seth Apter's new stencils!!!!!!

I find that the messier my mind, the messier my pages become.  I have been going through some rough times but I am committed to getting better every day.

Much Love my friends,
Paula

Tuesday, September 10, 2013

Blog Address Change!

Hi all!

Just a really quick post to let you know that as of tomorrow this blog address will be changed back to: www.journalartista.com  :) Please update your bookmarks, or subscribe by email to the side.


Much Love my friends xo
Paula

Friday, August 9, 2013

StencilGirl Talk Cupcake Sprinkles Blog Hop!


Welcome to another StencilGirltalk blog hop!

This month we are featuring the wonderful Cupcake Sprinkles stencil designed by June Pfaff Daley:


You can get this stencil and see all of June's designs HERE


I had a tiny chuckle when I first received this stencil.  I am still on my Artful Weight Loss journey and creating with this delicious stencil was a treat, but also very tempting!  :)

After creating a random background that matched the pink theme (I was drooling over Red Velvet cupcakes!), I chose to add a little dimension and added texture to the page.

Supplies:

Cupcake Sprinkles stencil
- sticky notes
- modeling or light modeling paste
- palette knife
- acrylic ink or paint
- willingness to get a bit messy :)


Step one is to mask off the desired area.  Use sticky notes to cover areas you don't want the modeling paste to get into.  Masking can be used for any medium you choose with your stencils!  I then set this aside.


I chose a Tri Art modeling paste.  You can use this straight out of the jar, however I wanted the icing to be pink.  I chose a pink FW acrylic ink however you can mix this medium with any acrylic paint as well.  I scooped a bit out with my palette and added a dropper full of ink.  Mix together with a palette knife.


Spread the modeling paste over the stencil with the mask in place.  The consistency of modeling paste is like peanut butter which enables any stiff peaks and texture you create to remain.  It dries to a very hard acrylic, however it takes a very long time to dry.  I choose not to use a heat gun to speed up the process as I find it can bubble and create a crust.  The above photo shows what the paste looks like after applying over the stencil.


Carefully remove the stencil. I repeated the process three more times, carefully avoiding touching the wet molding paste.  Clean your stencil right away!
I love how these turned out!  After seeing this I realized this stencil would also be an awesome ice cream scoop.


Finish with dabbing acrylic paint for the cup, sprinkles, and cherry.  I used a make up sponge to highlight the peaks with a little paint as well.


I also used the sprinkles as random texture, dabbing a bit of paint here and there on the page to tie it all in together.  Letter stickers were applied for the title.


This technique can be used on any type of project including cards, perfect for a birthday!

Hop over to the next blog!  ALL comments from ALL blogs on the hop will be entered into a StencilGirl Talk giveaway, don't miss out!


Thank you so much for visiting me!

Much Love,
Paula

StencilGrltalk Blog Hop

Sorry my friends, having technical difficulties please go to http://keystrokesandkaleidoscopes.blogspot.ca/?m=1 for the next project.

Please check back at 8am EST, my apologies!

Friday, July 26, 2013

StencilGirlTalk Blog Hop!


Welcome everyone!

Thank you for joining me as part of the StencilgirlTalk blog hop! We are focusing on this stencil:


I admit, I got a little excited when I saw this design.  It can be layered to make many designs, however I wanted to use it as a form of funky sequin waste!

I started with this mini journal.  It's a sample book from Strathmore in 4x6" Mixed Media paper:


I started by applying gesso to each page.  After the gesso was dry I applied a layer of Derwent Inktense Blocks in two different colours for each page, wetting with water.  Next I took a baby wipe and wiped off the Inktense through the stencil.  

This is how a few pages turned out:


As shown above, I added a little background stamping with a few Prima stamps and Ranger Archival Ink. Stamping in the background is a great way to add visual interest and texture to your pages.

I then added multiple layers of stenciling with craft paint and a makeup sponge, assuring each layer is dry prior to starting the next.  I chose to do two layers for each page, utilizing different areas of the stencil each time.

To finish, I chose to add a layer of the tiny diamonds section with cream paint to all pages.  This helps make the entire book cohesive.

I really wanted to make a portable affirmation book for my fitness journey.  I used a Faber Castel Big Brush marker in black and hand wrote each affirmation, and used an Archival Black ink pad.

Check out all the finished pages!


Here is a close up of the multiple layers of overlapped stenciling:


Be sure to subscribe to me on Youtube to see more tutorials!  This techniques will be up soon!
In the meantime, check out this video:


Thank you so much for visiting me!  Be sure to hop onto the next blog in the list to see other wonderful ideas using this stencil!  Also, don't forget that there is a wonderful giveaway going on on the StencilGirl Talk blog.  Be sure to comment on that blog as well as all the others in the hop, the more blogs in the hop that you comment on, the more chances you will have to win!

Paula Phillips <----- are="" here="" span="" you="">


Much Love!
Paula aka JournalArtista
Related Posts Plugin for WordPress, Blogger...