
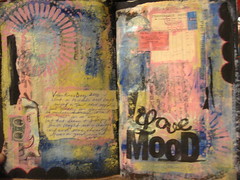
Love Mood- WIP complete
Originally uploaded by JournalArtista
I decided to document my process of layering from start to finish.

Step 1:
A coat of green and pink paint scraped on with a credit card. I added some masking tape on the right side.

Step 2:
Added some old scrapbook paper, a sticker stamp and a bit of gesso.

Step 3:
Some random stamping, a few old stickers and some metallic watercolour paints, although they are hard to see.

Step 4:
I added Liquid Acrylic here, wiped some off with a baby wipe. I find that this is the awkward stage for me, where I think "Uh oh, I really messed it up, this is not where I wanted to go." BUT, I proceed. When I sit down to create a page I very rarely have a design in mind, I just let it out. Sometimes this is very hard because the inner critic comes-a-screaming. Keep pushing through this if it happens to you!

Step 5:
I added some of the same pink paint through a stencil. I also added some black texture stamping and sponged on a bit of the green paint as well to soften the bold blue.

Step 6:
I was really happy with where this was going at this point. I painted the bumpy black border, added more masking tape (both black and regular) and a scrap of scrapbook paper. I added a bit more green paint on top of these to make them blend in.

Step 7:
Blurry picture, I know. I apologize. Anyway, to complete this page I added some collage elements, foam stamps for my title and a bit of pink glaze pen. I journaled with my good old blue Bic pen.
Thanks for looking! My hope is to show you that you can push through the "uglies", the awkward stage. Something beautiful will be waiting for you on the other side.
Much LOVE!
Love looking at all the steps! Yummy yummy background!!
ReplyDeleteThanks for sharing your process!! I especially like the stencil that is in pink and the blue sunburst stamp!
ReplyDeleteYou did a fantastic job! Almost like a collage tutorial. I love the end result. That page is really fantastic. And you're right, there's always a miracle on the other side of ugly. Gotta love those creative brick walls....
ReplyDeleteGreat page. I love the colors on this page.
ReplyDeleteThanks so much for posting a step by step, I love to watch the layers build up :)
ReplyDeletehi paula,
ReplyDeleteawesome that you show your step by step process. I always mean to, but never remember to take pictures during my process. Thank you for your sweet comment :)
I love the way you did this. Thanks so much. I'm relieved that someone else has that demon critic that hangs around on the fringes to screw up my days. Working past that critic is sweat worthy though.
ReplyDeleteI love this! Thank you for sharing! I've had to push through "the uglies" more than once! Believe me!!!
ReplyDeleteThank you for sharing your process and pushing through to the other side of the 'ugly'.
ReplyDeleteI really love seeing the step-by-step process. Thanks for sharing!
ReplyDelete